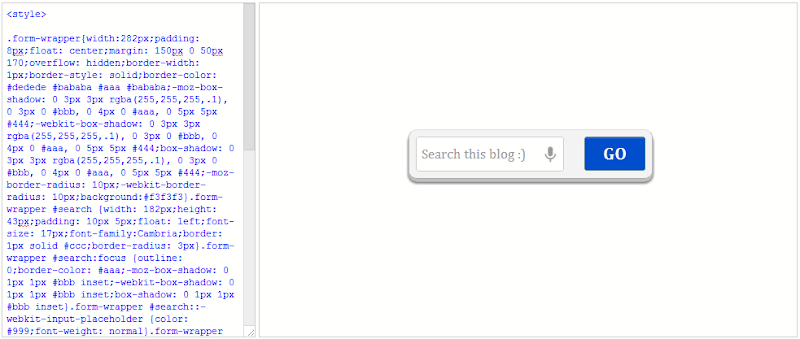
If you are a big fan of CSS and love to create and design widgets for your blog using CSS than you would be happy to know than we have launched a new editor page on our website which allows you to design and preview your widgets. With this easy and fast editor you can just add your CSS code and your HTML and than hit the preview button and your widget will be rendered on the right hand side.
So as you can see in the above image I just added the CSS and HTML for my search widget and it rendered perfectly on right hand side. So sometimes it might give some padding and margin problems but in reality the widget will work superb.
well if you are a blogger and would like to add this editor in your blog, then we have even posted the source code below which will help you in embedding this editor right in your blog.
- Open Blogger > Pages > New Page. (You can also add this to any of your post or even in your wordpress blogs)
- Now just shift to the HTML Tab and paste below code into it.
<table>
<tbody>
<tr>
<td>
<form method="post" name="form1"><textarea style="border-bottom: #cccccc 1px solid; border-left: #cccccc 1px solid; padding-bottom: 5px; margin: 0px; padding-left: 5px; width: 300px; padding-right: 5px; font-family: courier new; height: 400px; color: blue; font-size: 12px; border-top: #cccccc 1px solid; border-right: #cccccc 1px solid; padding-top: 5px; scroll: auto" onclick="focus(this.code)" name="code"><style>
Add CSS Code Here
</style>
Add HTML Code Here</textarea> </form></td>
<td valign="top"><iframe style="border-bottom: #cccccc 1px solid; border-left: #cccccc 1px solid; padding-bottom: 5px; padding-left: 5px; width: 650px; padding-right: 5px; height: 400px; border-top: #cccccc 1px solid; border-right: #cccccc 1px solid; padding-top: 5px" src="about:blank" name="preview"></iframe></td></tr></tbody></table><button class='preview-button' onclick="preview.document.write (document.getElementsByTagName ('TEXTAREA')[0].value); preview.document.close(); preview.focus()">Preview</button><button onclick="window.document.form1.code.value='';preview.document.write (document.getElementsByTagName ('TEXTAREA')[0].value); preview.document.close(); preview.focus()">Clear</button> - Now to give the perfect permalink to this editor URL simply enter a single keyword like Editor as your page name and hit Publish.
- Now when you will view the page it will be like www.example.com/p/editor.html so now you can edit the page once again and rename it what you would like to add.
- Something like CSS Widget Editor or anything, but your permalink will remain the same, so this way you get short URL.
So now your CSS Widget Designer is up and running, you can simply make some modifications to the design and layout of this widget if you are somewhat good @ CSS, rest everything is explained, face some problem do comment.
HTML Editor for Designing & Previewing your CSS Widgets [FreeSV]
![HTML Editor for Designing & Previewing your CSS Widgets [FreeSV]](//lh5.ggpht.com/-CAoa7qS4Ucg/T9W-C_A8XtI/AAAAAAAAEmA/HWhGPjoJmQ4/s72-c/capture1_thumb%25255B2%25255D.png?imgmax=800) Reviewed by FreeSV
on
11:20:00 AM
Rating:
Reviewed by FreeSV
on
11:20:00 AM
Rating:
![HTML Editor for Designing & Previewing your CSS Widgets [FreeSV]](http://lh5.ggpht.com/-CAoa7qS4Ucg/T9W-C_A8XtI/AAAAAAAAEmA/HWhGPjoJmQ4/s72-c/capture1_thumb%25255B2%25255D.png?imgmax=800) Reviewed by FreeSV
on
11:20:00 AM
Rating:
Reviewed by FreeSV
on
11:20:00 AM
Rating:


No comments: